Stoma Training
- General Stoma Care
- Stoma Pouch System
- Changing Your Pouch
- Night Drainage System
- Ostomy Skin Care Guide
General Stoma Care
 Caring for your stoma is usually easy to do.
- It may be uncovered while you shower or bathe.
- To clean your stoma, wash the outside with warm water and a gentle soap.
- To dry your stoma, pat it gently with a soft towel. Never scrub your stoma.
- When bumped or rubbed, your stoma may bleed slightly. If this happens, wait a few minutes as the bleeding should stop on its own. If it continues to bleed, apply pressure to the area and call your doctor.
Emptying Your Stoma Pouch
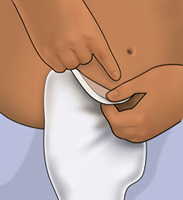
![]() This is the first task you will learn after your surgery. A stoma nurse will help you learn how to empty your stoma pouch. It is recommended that you empty your pouch when it is one-third to one-half full. If your pouch is too full it will start to pull away from your skin. This will cause urinary leakage, skin irritation, and make you feel uncomfortable. To empty your pouch, you will need to follow these steps:
This is the first task you will learn after your surgery. A stoma nurse will help you learn how to empty your stoma pouch. It is recommended that you empty your pouch when it is one-third to one-half full. If your pouch is too full it will start to pull away from your skin. This will cause urinary leakage, skin irritation, and make you feel uncomfortable. To empty your pouch, you will need to follow these steps:
- Sit or stand alongside the toilet with the lowest part of your stoma pouch pointing to the area between your legs.
- Place a layer of toilet paper in the toilet bowl to prevent urine from splashing
- Hold the bottom of the pouch up. Open the pouch by twisting the nozzle or removing the nozzle plug. Before lowering the pouch, pinch together the nozzle.
- Slowly lower the nozzle toward the toilet.
- Release your fingers and let the urine drain.
- When empty, tap the nozzle to remove any last drops of urine.
- Close the pouch by twisting the nozzle into the “CLOSED” position or replacing the nozzle plug.
Changing Your Pouch
Step 1: Removing the old stoma pouch
 To remove the old stoma pouch, begin by peeling away one corner of the wafer (skin barrier). With one hand pressing the skin and the other hand lifting the wafer, gently remove the wafer from the skin. You can use adhesive remover pads to help lift the wafer off of your skin. Many wafers contain alcohol and may be irritating the skin. Make sure to clean off the skin with soap and water. Place the old stoma pouch in a plastic waste bag.
Step 2: Cleaning your stoma
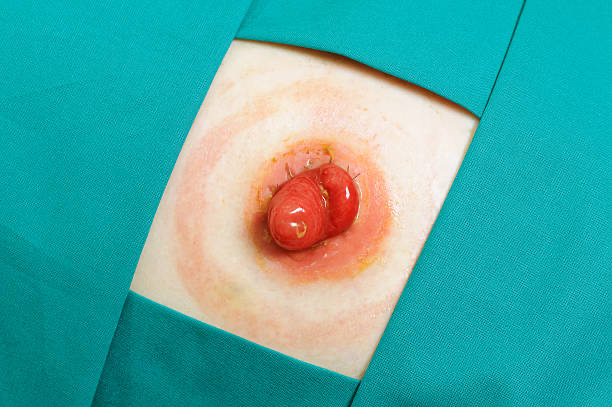
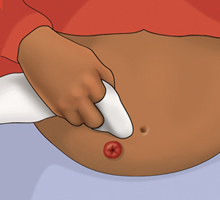
- Look at your stoma. Your stoma should be red and moist. If the color is blue, purple, or black this may be considered a medical emergency. Call your physician immediately.
- Look at your skin around the stoma. Your skin around the stoma should look like the rest of the skin on your abdomen.
 If there is no irritation, wash the skin around your stoma with warm water using a washcloth or soft paper towel. A small amount of bleeding from the stoma is normal when washing or cleaning the skin. Do not use lubricating soaps, oils, or alcohol. Gently pat the skin dry.
- If skin is raw, wet or open, sprinkle “Stomahesive Powder” only on the wet, open skin. This will help the skin heal and will allow the new skin barrier to be attached to your skin.
- Then “lightly pat” the barrier wipe over the power to form a protective film and “seal” it. Also, wipe the skin around the stoma where the wafer will touch the skin, Let the area dry for 1-2 minutes.
Step 3: Fitting a new skin barrier to your stoma
 Select the circle size on the measuring card that fits closest to the size of your stoma without touching it. Cover your stoma with a piece of tissue to catch any urine leakage while you are measuring your stoma.
 - Trace the best circle size that fits your stoma onto the back of the paper on the wafer (skin barrier).
- Use the scissor to cut the wafer to this circle size.
- Center the new opening over your stoma to make sure it fits along the stoma edge. If it does not fit, cut and adjust the opening until it fits.
- If you are using a one-piece collection system (bag), place your finger into the small pre-cut opening and push away the bag before you start cutting to avoid damaging the bag. If the bag is damaged, you cannot use it. In order to prevent odor, you can also add a liquid deodorant to the bag as well.
Step 4: Applying a new pouch
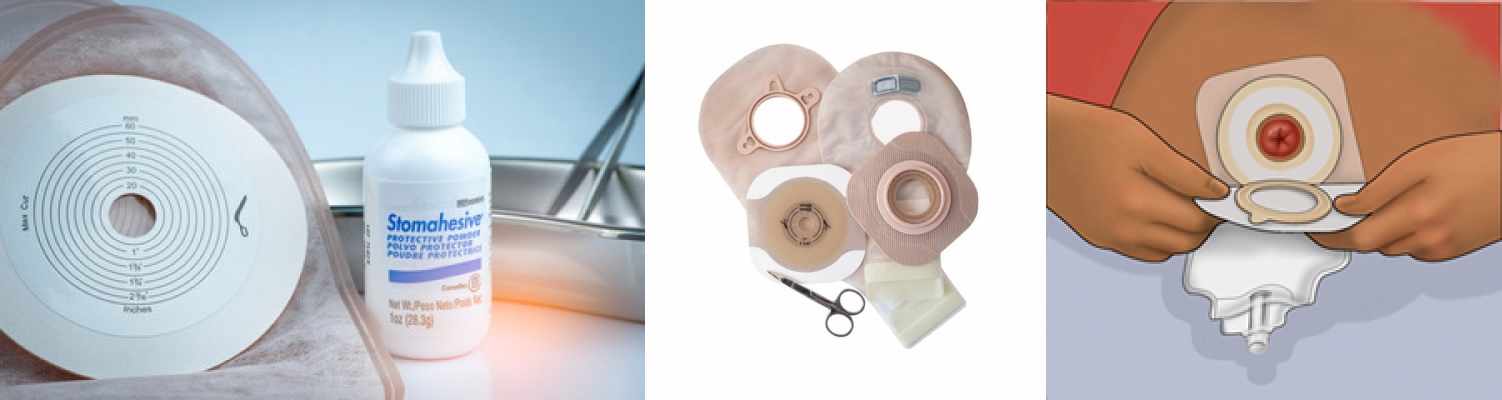
- If you have a two-piece system (pouch), attach the pouch to the plastic ring on the wafer.
- Peel the paper off of the back of the wafer.
- Put stomahesive paste around the opening on the sticky side of the wafer. Squeeze stomahesive paste around the hole on the wafer, the same thickness that you would squeeze toothpaste onto a toothbrush.
- If the skin around the stoma becomes red or open, you may need to stop using Stomahesive Paste® and use an Eakin Seal® a soft, flexible pectin ring. Mold the Eakin Seal® on the skin around the stoma.
- Center the pouch around the stoma and place it onto the skin. Firmly press the wafer to the skin near the stoma and hold for 30 to 60 second so that the wafer sticks to the skin.
- Make sure that the tap at the bottom of the pouch is turned to the “CLOSED” position.
- Wash your hands.
Night Drainage System
What is the night drainage system?
A night drainage system can be attached to the stoma pouch before you go to bed. This system collects and stores urine, allowing you to sleep all night without getting up to empty the stoma pouch.
Parts of the Night Drainage System:
The parts of the night drainage system are shown here. Talk with your physician or the stoma nurse about what will work best for you.
Setting up the night drainage system:
 There are several types of night drainage systems. Each night drainage system consists of several parts. Whichever type you chose, you will need to set up the system (connect parts) before connecting it to the stoma pouch. Be sure to do the following:
- The tubing and the container may be separate or connected. If they are separate, connect the tube to the lid of the container. Keep it connected until it’s time to replace the container.
- Each night, connect the other end of the tubing to the drain on your stoma pouch.
- You may need an adapter to connect the tubing to the drain. Most pouches come with such adapters. Connect the adapter to the tubing. Keep it connected until it’s time to replace the container.
- Replace the container when it starts to look cloudy or changes color.
At night:
The stoma pouchshould be about one-fourth full when you attach the drainage system to it. This will help urine flow into the tubing from the stoma pouch. To attach the system to your stoma pouch:
- Place the night drainage container in a basin on the floor next to your bed.
- Connect the tubing to the stoma pouch.
- Open the closure on the stoma pouch drain. This way, urine can flow through the tubing.
- Use a leg strap to keep the tubing next to your thigh. This will help prevent the tubing or the stoma pouch from twisting.
In the morning:
To detach the night drainage system from the stoma pouch each morning:
- Return the stoma pouch drain to the “CLOSED” position to prevent leakage.
- Remove the lid from the night drainage container (but keep the tubing in place).
- Empty the night drainage container’s contents into the toilet.
- Rinse out the tubing and container with cool water in the bathroom sink or tub. Let the tubing and container air-dry.
How to clean the night drainage system:
Clean the night drainage system every 2 to 3 days. Follow these steps:
- Set white vinegar, a measuring cup, and a funnel next to the bathroom sink or tub.
- Pour 1/4 cup vinegar through the tubing into the night drainage container.
- Pour 2 cups cool water through the tubing into the container.
- Let the tubing and container sit for at least 1 hour. Then, empty the contents into the toilet.
- Rinse out the tubing and container with cool water.
- Let the tubing and container air-dry.
- Open the closure on the stoma pouch drain. This way, urine can flow through the tubing.
- Use a leg strap to keep the tubing next to your thigh. This will help prevent the tubing or the stoma pouch from twisting.
Ostomy Skin Care Guide
Basic Ostomy Skin Care Guide (Wound, Ostomy and Continence Nurses Society)
Open PDF GuideThis resource document gives answers to some of the questions that people ask about the care of a stoma and the skin around the stoma.
Peristomal Skin Assessment Guide (Wound, Ostomy and Continence Nurses Society)
Open Web ToolThis Peristomal Skin Assessment Guide is for teens and adults with an ostomy. It is designed to help you identify some common skin problems, things you should do, and when you should visit a wound, ostomy and continence (WOC) nurse or nurse specialized in wound, ostomy and continence (NSWOC) for additional support.
This guide is not meant to replace advice from a medical professional.
UOAA Skin Care Resources
Open Web ResourcesManaging and preventing irritation of skin around the stoma is critical to maintaining a positive quality of life when living with an ostomy. Always seek the guidance of an ostomy nurse when dealing with skin issues and selecting products that may help you maintain healthy peristomal skin.